Let's break this BLE112 out!
< in progress >
Tuesday, April 29, 2014
HIH-4030 humidity sensor
Humidity is weird. We experience it all the time, but what we're really feeling is relative humidity. RH is variable with changes in the temperature, and so any humidity sensor must also have some sort of temperature value to compare with to make a realistic estimate of the actual relative humidity.
Fortunately, the HIH-4030 Breakout is pretty darn simple to set up, as you can see above. Hook up the power, ground, output, and you're basically done. The only part left is programming your microcontroller to correctly interpret the analog signals from the sensor.
Fortunately, the HIH-4030 Breakout is pretty darn simple to set up, as you can see above. Hook up the power, ground, output, and you're basically done. The only part left is programming your microcontroller to correctly interpret the analog signals from the sensor.
Monday, April 28, 2014
How to solder small pins
If you're a maker like me who likes to test your ideas out with free samples (Texas Instruments, Microchip) then you'll want SMT & SMD soldering as a skill in your arsenal.
I'll be covering David Merrill's guide on soldering small pins, because I believe it's the best strategy with the resources many hobbyists have access too.
The tools I'm using in this demonstration are:
- BLE112 Bluetooth Smart Module
- BLE112 Bluetooth Low Energy Breakout
- SMT parts
- soldering iron
- solder
- flux
First thing you always need to do when soldering, is to find a open space where there is good airflow and sufficient lighting and of course a power supply for the soldering iron. Basements are garages are usually good, and a fan can help if the area is on the smaller side.
Gather all your materials, and get settled in your workspace.
<workspace picture>
A great method for soldering small pins is to pre-solder all the pins on the SMDs and board.
<pre-soldered picture>
Once soldered, lay the parts down in their respective locations, and join the solder nodes together by gently touching the solder to the pins.
<soldered board>
It's as simple as that. Now just interface your module and see if it gives you a good response!
I'm also going to write up a little guide for using conductive-glue pens, so stay tuned!
Tuesday, April 22, 2014
BLE112
The BLE112 module is a great option if you are looking to include the newest Bluetooth 4.0 (Low-Energy) functionality in a embedded system design. The only downside (as you may be able to tell from above) is that the pins are fairly small, and are only suitable to be soldered to a final production design.
To solve this issue, I've ordered the breakout board below:

After soldering the BLE112 module to the breakout board (and the additional SMT components I recently found out are not included) the pins on the breakout should be easy enough to access. The final development set-up should look like the following:

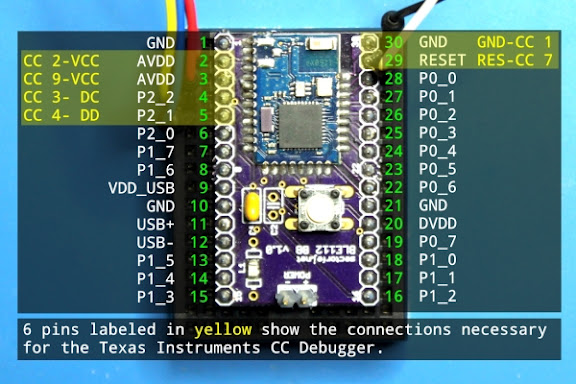
Once broken-out, interfacing will be as simple as referencing this diagram:

Subscribe to:
Comments (Atom)


