Monday, September 22, 2014

How to build a custom relay

Relays are awesome little devices that allow small voltages to open and close a circuit, enabling a more powerful current to flow to it's destination.


The parts we'll need are...


  • 1" x 1" proto-board
  • 1k-1.5k ohm resistor
  • red light emitting diode (LED)
  • junction boxes
  • small relay
  • RCA jack
  • solder

The tools we'll need are...

  • soldering iron

Friday, May 2, 2014

CC Debugger


The CC Debugger is primarily used for Flash programming and debugging software running on CCxxxx
8051-based System-on-Chip (SoC) devices from Texas Instruments. The PC tools available for these
purposes are the SmartRF™ Flash Programmer from Texas Instruments and IAR Embedded
Workbench® for 8051 from IAR Systems.

When connected to the debugger, the SoC devices can be controlled directly from SmartRF™ Studio.
SmartRF Studio is also able to control supported CCxxxx RF transceivers (CC2520, CC2500, CC110x,
CC11xL, CC112x, CC120x) when they are connected to the debugger.

LeoPhi pH sensor


If you're seeking a complete pH, temperature, and humidity solution, look no further.

It seems Sparky has our backs, and has done a lot of the PCB work for us!

Easily interfacing with Arduino technology through multiple protocols, the LeoPhi is a great option for monitoring pH data in real-time.

Tuesday, April 29, 2014

Proto-Hack Challenge: April

Let's break this BLE112 out!


< in progress >

HIH-4030 humidity sensor

Humidity is weird.  We experience it all the time, but what we're really feeling is relative humidity.  RH is variable with changes in the temperature, and so any humidity sensor must also have some sort of temperature value to compare with to make a realistic estimate of the actual relative humidity.


Fortunately, the HIH-4030 Breakout is pretty darn simple to set up, as you can see above.  Hook up the power, ground, output, and you're basically done.  The only part left is programming your microcontroller to correctly interpret the analog signals from the sensor.

Monday, April 28, 2014

How to solder small pins


If you're a maker like me who likes to test your ideas out with free samples (Texas InstrumentsMicrochip) then you'll want SMT & SMD soldering as a skill in your arsenal.

I'll be covering David Merrill's guide on soldering small pins, because I believe it's the best strategy with the resources many hobbyists have access too.


The tools I'm using in this demonstration are:
First thing you always need to do when soldering, is to find a open space where there is good airflow and sufficient lighting and of course a power supply for the soldering iron.  Basements are garages are usually good, and a fan can help if the area is on the smaller side.

Gather all your materials, and get settled in your workspace.

<workspace picture>

A great method for soldering small pins is to pre-solder all the pins on the SMDs and board.

<pre-soldered picture>

Once soldered, lay the parts down in their respective locations, and join the solder nodes together by gently touching the solder to the pins.

<soldered board>

It's as simple as that.  Now just interface your module and see if it gives you a good response!

I'm also going to write up a little guide for using conductive-glue pens, so stay tuned!

Tuesday, April 22, 2014

BLE112


The BLE112 module is a great option if you are looking to include the newest Bluetooth 4.0 (Low-Energy) functionality in a embedded system design.  The only downside (as you may be able to tell from above) is that the pins are fairly small, and are only suitable to be soldered to a final production design.

To solve this issue, I've ordered the breakout board below:

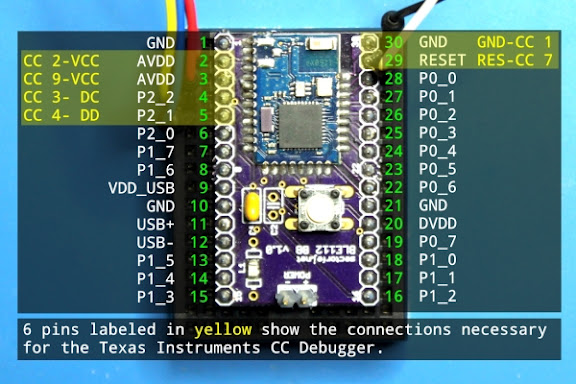
After soldering the BLE112 module to the breakout board (and the additional SMT components I recently found out are not included) the pins on the breakout should be easy enough  to access.  The final development set-up should look like the following:

Once broken-out, interfacing will be as simple as referencing this diagram:


Saturday, March 22, 2014

Arduino Relay Shield

The Arduino Relay Shield is a nifty little embedded relay system made to fit right onto most Arduino development boards.  It greatly reduces the development time of prototyping intelligent high-power systems such as timed pumps or fans.


Arduino Uno

The Arduino Uno is a development board for the Atmel ATMega 328P Microcontroller.

Monday, February 24, 2014

CC2540 Mini-Development Kit

The CC2540 Mini-Development Kit


I'm super excited to crack into this thing, but I'll give a little background first on why this kit is so bad-ass.

The kit is for testing the CC2540, which is a Bluetooth Low Energy system on a chip solution.

What does that mean?  It means you can use your smartphone or any other Bluetooth Smart device to control embedded systems!

The applications of this chip are practically endless, so let's not wait any longer! Let's dive in!

Contents:

CC2540 USB Dongle


CC2540 Keyfob Board


Keyfob plastic case


CC Debugger

Debugger USB cable

Debugger pin cable


3V Battery


Tuesday, January 28, 2014

CC2540

The CC2540 is a Integrated Circuit (IC) System on-a Chip (SoC) responsible for microcontroller processes with an included 2.4 GHz Bluetooth Low-Energy module.


Saturday, January 4, 2014

How to Problem Solve - Funny Cats Edition


Problems solving is a skill, one which can be refine and improved in just about anyone...

For my example, I'll be using the simple situation of cleaning a litter box.


Step 1:  Analyze a problem statement, typically expressed as a word problem.

"How is a litter box cleaned?"


Step 2:  Express its essence, abstractly and with examples.

"Get everything I need, clean the poop out until it's gone, then add litter, and put everything away."


Step 3:  Formulate statements and comments in a precise language.


Statements
Comments
1
"Prepare for task"
get scooper tool, litter box, bag, litter. find litter box
2
“Completion detection loop logic”
if no poop detected, goto statement 5
3
“Remove unwanted objects”
scoop poop, place in bag,
4
“Scan for unwanted objects”
look for more poop, goto statement 2
5
“Add required material”
reinsert litter to replace the removed material
6
“Return to original state”
dispose trash, return litter. return to previous task


Step 4:  Evaluate and revise the activities in light of checks, tests and details.


Think of how your specific situation calls for changes in the overall algorithm.
Think of how you may need to break down certain statements into multiple specific statements, or add new ones entirely to satisfy the requirements.

Wednesday, January 1, 2014

Understanding Programming


I really like this guide to learning to program, because it doesn't teach you to code.

It's all about logic, which is what programming is really all about.

It's a read everyone ought to investigate.

http://programmingstage.blogspot.com/

Understanding the operation regions of Bipolar Transistors

Transistors have two main purposes in modern electronics, switches and amplifiers.


How the transistor's base controls the flow of electron from the collector to emitter is builds upon diode technology, and must be studied to fully understand the transistor.